The Photographer’s Holy Trinity refers to the three most important settings to consider when shooting a photograph; aperture, ISO and shutter speed. Before I explain the relationship between the three, you must know what each of the terms mean.
Aperture – the circular opening inside a
lens that adjusts in diameter to control the amount of light to be captured by your camera sensor or film. Aperture is measured in f-stops. Lower numbers mean a larger opening, for example, f/2.8 is larger in diameter than f/5.6. A larger opening gives a more shallow depth of field (what is in focus). A smaller opening gives a greater depth of field. Remember though, aperture is only a part of the formula. You have to consider shutter speed and ISO as well.
ISO – originally a term used to rate the light sensitivity of film, but has also been adopted to rate the light sensitivity of a digital camera’s imaging sensor. But you will find that as you increase in ISO you lose image quality. Higher ISO levels open your image up for more noise or grain.
Shutter speed – refers to how long the shutter is open to expose the image sensor to light. It is measured in fractions. 1/60 refers to 1 sixtieth of a second. 1/125 refers to 1 one hundred twenty fifth of a second. So, 1/125 is a faster shutter speed than 1/60. On most cameras the shutter speed is shown without the fraction. 1/60 would appear as 60 and 1/125 would appear as 125. Just remember that the higher the number, the less time the shutter is open and the less blur you will get. The lower the number the longer the shutter is open, leaving more room for blurring.
Now you are asking yourself, what am I supposed to do with this information? If you are anything like me, you need a visual. Please see below.
As you can see, at point a you have a smaller diameter or opening within your lens. As mentioned before, a smaller opening will allow you to have more in focus or a deeper depth of field. At point b you have a larger diameter, giving you less in focus or a more shallow depth of field.
At point a, the camera ISO is set at a lower number, therefore the image should have less noise or grain. At point b, the camera ISO is set at a larger number, which often gives a lot a noise or grain.
At point a, you have a faster shutter speed (shutter is open very briefly) so the sensor doesn’t capture too much movement in your subject. It’s like blinking your eye quickly. If you blink quickly you see only a quick snapshot of what’s in front of you. But at point b, the shutter speed is slower (shutter is open a bit longer) so it captures more movement in the subject. If you leave your eyes open a bit longer you see more movement in what’s in front of you.
ALL TOGETHER NOW
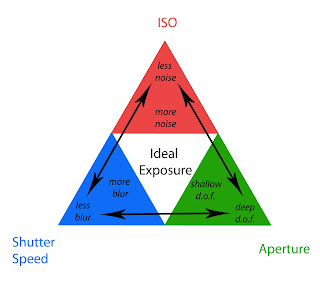
Now, because all three of the elements work together, it is important that you see them all on the same graph. Hopefully this graphic will give you a better understanding of how they work together.
Each corner represents an element in the formula. The further you get from that corner, the larger that element increases. But you will notice that the further you get from one corner, the closer you get to the other two, which means as that element increases, the other two decrease. For example, if you increase the time on the shutter speed (which means the shutter will be open longer), the smaller aperture (smaller diameter) and lower ISO (less sensitive) you will need. If you increase your aperture (larger diameter), you will need a lower ISO (less sensitive) and faster shutter speed (decreases amount of time that the shutter is open) . If you increase your ISO (more sensitive), you will need a faster shutter speed (less time open) and a smaller aperture (smaller diameter).
Now that you understand how the triangle works, let’s plug in some of that information from earlier. See the image below and notice the changes I made.
THE BIG PICTURE

Now you can see how adjusting one element will affect another. For example, if you increase the time on your shutter speed you are at risk for more blurring, but you will get a deeper depth of field and be less at risk for noise and grain. If you are shooting and notice you have a lot of noise, you might decrease your ISO, but have to slow down your shutter speed (at risk for blurring) and increase your aperture (losing some depth).
This is a lot to take in at once. Don’t kill yourself trying to figure out where to start. The best way to learn it is to get out your camera and just start taking pictures in different environments. Start on auto to see what your camera recommends in that particular setting, then switch to manual and start with the suggested settings. If the image isn’t what you want, look at the triangle and see what you need to adjust. Ask yourself, “What is wrong with this picture?”. If it’s too much light, start with ISO. If it’s blur, start with shutter speed. If it’s depth of field, start with aperture. Just remember that each element works in conjunction with the other.
Well, that’s it for today folks! I hope that I am as accurate as I think I am. If you find a discrepancy, please let me know. (In a polite, tactful way.) Just remember, I am learning too. We are in this together!


No comments:
Post a Comment